Saturday, May 30, 2015

Updating Ubuntu for the Unexperienced and

Time has come to update one of our Ubuntu boxes.  I can never remember how to do it and always have to go lookup the commands.  Maybe if I write them down here it'll help me remember them for next time.

I started with a lsb_release -a to see what version I was on.  Which happened to be 12.0.4.5 so I wasn't too far out of date.

Then I ran sudo apt-get update and then sudo apt-get upgrade to update all the packages that were available on the current version.  That brings me up to a fully patched system that needs to be upgraded to the latest LTS version (this is a production box running applications so I like to stick with LTS versions, I've never had a need to utilize the long term part, but it makes me feel better).

Next step I did was sudo apt-get dist-upgrade.  I'm no expert and I probably could have skipped this step and it's possible this step caused my later troubles.  Hind sight is 20/20 they say.

Now I just need to make the plunge and upgrade to the next release.  That's pretty easy,  sudo do-release-upgrade handles that.  And then the fun started.

Part way through this it prompts me because some of the apache configuration files have been modified from their originals.  I look through these changes and it really doesn't seem to like too big of a deal, but I don't want to stumble into something since most of these tweaks were done 2 years ago so I make a backup.  This machine is virtual and I didn't have the machine integration plugin installed so I couldn't switch between consoles there.  No problem though, I just SSH'd back into the machine and made a quick copy of the config file in question and then told the updater to replace it.  

The update gets done, I give the box a reboot, it seems to come back up normally and I think all is right in the world.  Then I pull up one of the websites hosted on the box and it just displays the content of the php file rather than processing the php file.  Maybe it's just this one site, nope, all the sites are equally broken.

No sweat, I've got a backup of that configuration file.   So I compare my "custom" file to the new file and don't see anything obviously wrong with it.  Obviously some of my tweaks are gone, but those wouldn't affect php not running.  I try restarting apache and it complains about a line in a configuration file (if I had noted the file I would have shared it here), that line looks like it has sometihng to do with php.  I did a bit of Googling and came across a reference to enabling php module with this command sudo a2enmod php5.  No luck, restarted apache, still no luck, same error and web pages still aren't right.

I find the command apt --installed list to show which packages are installed. I see a lot of php5-something else packages, but no php5 package.  I run sudo apt-get install php5 and let it install (it doesn't complain that it's already installed).  I restart apache and it works.  No error.  My web pages are back to normal.

I run apt --installed list again and it shows php5 is now installed.


In hind sight I think maybe the apt-get dist-upgrade may have been what did me in.  I'm not sure why, but none of the other commands should have removed any packages.  I guess if I had paid more attention to those apt-get message about packages being updated and being removed I would have been on top of this.  Lesson learned.

Sunday, November 16, 2014

Zenworks Configuration Management Updating 11.2.0 to 11.2.4

Sometimes I can get a little behind.  You really know you're behind when you go to System Updates and look at the release date and realize it was a year and a day before your download date.  But that's the name of the game.  We jumped from Zenworks for Desktop 7 straight to Zenwork Configuration Management 11.2 last summer and brought all of our XP clients along with us.  For the most part 11.2 was a good version for us and our XP clients and we didn't really have a need to upgrade.  Fast forward a year and we've deployed a whole lot of Windows 7 machines and are running into some bugs that have been patched, now we need the update.  A good long weekend with a couple of user free days looked like the perfect opportunity to do the upgrade.

You can safely ignore that "Check for Updates" option in the System Update section.  It's a known issue (apparently been known for a while) and has something to do with the update being too big to download automatically.

To start out, grab the update from the Novell page (you can find it here http://download.novell.com/Download?buildid=ZCUFlvDkC9w~ ).  The instructions in the details section at the bottom are spot on.  Copy the file to the server, run the "zman sui" command, and now it shows up in the System Updates section.

The online instructions (you can find them here https://www.novell.com/documentation/zenworks11/zen11_sys_updates/data/bjppvdf.html ) look pretty straight forward but are not as clear.  You can skip the first couple of steps about getting the updates (since you just did that manually with the download and the zman sui). What through me for a loop was that I only wanted to update one server before I rolled it out to the rest of the servers.  Which is their recommendation.  The instructions aren't obvious on this.  The process starts out designate a server and then assign the update.  That looks pretty easy.  What they don't tell you is that you don't assign the update on the frontend, you pick the update and set it to install and then pick which server on the backend.  If you read ahead this becomes a bit clearer and after you've done it once it's really obvious how it works and it's really easy.  But for the first time through it not super clear and can be a little unnerving.

The update on the first box went pretty smoothly.  It took an hour or so (quick description, about a dozen primary servers spread out across different sites, ~3000 devices total, internal Sybase DB, running in a Hyper-v VM on a Dell R720 with the slowest 10K SAS hard drives ever).  After it came back up the Configuration tab of the ZCC showed no version for the server.  That did induce a little bit of panic, but running a "zac ref" on the server updated the display version so it showed the correct 11.2.4.0 version number.  That trick would come in handy as most of the updated servers also showed up blank, but refreshing the agent on those boxes fixed it.

Then I kicked off two more server updates.  Two hours later they both showed "Rebuilding Deployment Packages"  This wasn't cool, the first server updated in around 2 hours and it supposed to take the longest.  I searched around to see what I could find.  Since I had two boxes I left one alone and picked on the other.  I tried a "zac ref", no luck, I tried a "zman surp" (found that on the forums) still no luck, tried a reboot, nothing.  I did dig around in the file system and I found the folder C:\Program Files\Novell\Zenworks\install\downloads\msi which looks to contain the deployment packages.  I noticed that most of the files had varying timestamps from today and that some of the timestamps were only a few minutes old.  That would mean it was still actually doing something and hadn't stalled.  So I left that folder open and went about searching for more things to check or try and while I did that it finished... Update Completed.  Then the box that I hadn't touched finished a few minutes later.  Apparently, I was just impatient.  I'm glad I didn't toast the box trying to hurry it along, but it is nice to know that the process can be fairly resilient.

Then I picked a few more to start upgrading and kicked them off.  They seemed to progress nicely.  I picked the remaining boxes and set them a scheduled time over night to upgrade.  Crossed my fingers and went home.

I arrived in the morning to find some boxes updated, some boxes "Rebuilding Deployment Packages" and one box failed.

The failed box hadn't run out of space, the update was all there, and the log files looked to just have a simple "failed to update..." message.  So I selected the box from ZCC and selected "Redeploy update to device", it jumped back to rebuilding packages and in about 20 minutes it showed "Update Completed".  Easy enough right?

The rest of the boxes?  Just slow.  As the morning progressed they slowly started finishing.   All except for one.  Over a day later is looked like it was stuck.  I gave it a reboot and a couple of hours after that I tried to the "zman sui" command.  A few hours later I rebooted again and waited.  It finally picked up and finished.

Monday, April 14, 2014

Zenworks Configuration Management, PXE, and Firewalls

I recently added a new site to my ZCM setup and I couldn't get the clients to PXE boot.  This problem was particularly frustrating because it seemed so familiar and I knew that I had encountered it and fixed it once before.

I did remember to start the Proxy DHCP (pdhcp in some places) service and set it to automatically start.  That's a simple as going to the Services console, picking the "Novell Proxy DHCP Service" and setting the Startup type to Automatic and then clicking on Start.

But PXE still doesn't work.  What did I miss?

The firewall configuration.

Out of the box, the Zenworks installer sets a lot of firewall allow rules, but it doesn't set the ones needed for PXE booting.  You have to set those manually.  Here's how to do that.

Go to the Control Panel > System and Security > Windows Firewall.  Click on the "Allow a program or feature through Windows Firewall".  (You could just turn off the Windows Firewall if you wanted to, that would also fix this problem).


Then click on the "Allow another program..." button.

Then the "Browse..." button


Now you want to browse to your Zenworks folder.  By default that's C:\Program Files (x86)\Novell\Zenworks.  From there we're going to drill down further into the bin\preboot folder.  You should have wound up at C:\Program Files (x86)\Novell\Zenworks\bin\preboot


You'll notice a couple of applications: novell-pbserv, novell-proxydhcp, novell-tftp, novell-zisdservice, and novell-zmgprebootpolicy.  We're going to select and allow each of these in the firewall.  Just start with the first one, novell-pbserv, select it, then click the Open button.  Now you're back to the "Add a Program" screen, just click the Add button.


It should automatically check the box for the Domain network location which should be all you need.


At this point it's just rinse and repeat.  You'll click on the "Allow another program button" and go through and selecting all the "novell-xxxx" applications one by one adding them to the list.  Once you get them all done, it'll look like this.


How to change CTRL+ALT in vSphere Web Client

I've been working on setting up a new SYSPREP Win7.  I started the build on a virtual machine running on top of VMware vSphere.  I tweaked it and got it like I wanted it.  Then I went take the image in Zenworks and realized I couldn't get into the imaging mode.  To load the imaging menu you press CTRL + ALT during the PXE boot portion, but CTRL + ALT is also the same key combination to release control of the virtual machine window.  I could have just booted it from a Zenworks boot CD, but I wanted to use the PXE boot.  I looked through the options in vCenter and couldn't find anything related to the changing those settings.  Then I turned to Google and I found a bunch of posts talking about how you couldn't change it.  The outlook was starting to look a little bleak, but then I stumbled into a workaround.  Apparently, the standalone program VMPlayer and the vSphere console use the same configuration file.  You can find that file here:

C:\Users\yourusername\AppData\Roaming\VMware\preferences.ini

There are lot of guides on how to tweak the settings in that file.  But here's the settings that were relevant to what I wanted to do.

pref.hotkey.control = "true"
pref.hotkey.gui = "true"
pref.hotkey.shift = "false"
pref.hotkey.alt = "false"

These settings change the CTRL+ALT combination to CTRL + Win (that's "gui" above).  Keep in mind that the "Hint" across the top of the window still says press CTRL+ALT to release the cursor.   You also have to close and reopen the window for it to pickup the change.  I panicked at first because I changed the settings, couldn't get them to work and then forgot that I had changed them.  Later when I went back into a VM I couldn't get out of it.  I'll admit, it did take me minute to realize what I had done.

Thursday, April 10, 2014

Stubborn Broadcom USH device on a Dell E6400

I recently revisited the driver installation on a Dell E6400 laptop.  There was one stubborn driver that I couldn't get working, the "Broadcom USH" device.  Dell's support website didn't list a driver for this so I went out on a wider search across the internet forum.  I found a lot of posts talking about installing the Control Vault device drivers.  So I grabbed the Dell ControlPoint Security Device Driver and found that it was useless.  The drivers were wrapped in an installer (that I didn't want to run, I just wanted the drivers).  Then I scrolled a little further down the page and found the Dell ControlVault Driver package (here's the page where I found it). After extracting that exe file I was left with a bunch of MST files and one MSI file.  So I extracted the MSI and there they were, the elusive drivers.  But it wasn't just a straight forward install.

I tried to install the driver, but it didn't work either.  It told me it couldn't find one of the files.  At first glance, everything was there.  So I ran DPInst against it.  It errored on two different drivers.  I looked through their INF files and found that they were looking for 2 files that weren't there.  A ccidflt.sys and a cvusbdrv.sys were missing.  Looking in the folder there was a ccidflt.sys2 and a cvusbdrv.sys1.  Close enough, right?   I removed the extra number from the ends of the extension and ran DPInst again and it worked!

So there you go, sometimes drivers can be stubborn.  But a little persistence pays off in the end.

Wednesday, April 9, 2014

Chromebook Chargers (HP, Samsung, and Dell)

Again with the Chromebook posts, right?  There are tons of reviews out there.  But you can only rehash the same specs so many times.  In the K-12 market I need to know about the physical properties of the devices too.  Let's face it, these things are going to take some abuse.  What takes more abuse than the power connector?  The charger is going to be plugged up every day, it's got to be tough.

My first experience with a Chromebook was the Samsung Chromebook.  No model number, just the Chromebook.  That was the first ARM based one that was priced at $249.  My thoughts initial thoughts were wow, it's light, it's thin, maybe a little flimsy, but what's with that crazy small charger connector.  Really, is this a Nokia phone from 2008?  In saying that, I still love that particular model.  I was just worried about unleashing a hoard of students on that small connector.  The teachers haven't had an issue with it, but I feared the students.  I've seen what they were capable of with much more robust connectors.

Then I came across the HP Chromebook 11.  Not as thin or light, but not as flimsy either.  So how did that charger connector stack up?  It's micro-usb.  That's great, right?  I really thought it was.  It's micro-usb! Most of these kids are used to plugging these up with their cell phones.  My toddler can plug up a micro-usb connector.  Not to mention that micro-usb chargers are everywhere which should have been a huge advantage (but it's not, just Google it for the details, the short version is that cell charger doesn't provide enough juice, Chromebook battery will die while trying use and charge at same time).

All micro usb connectors are not the same.  The HP Chromebook 11 appears to have a micro-a usb socket.  What is that you ask?  It's almost just like the ubiquitous micro-usb connector.  In fact, the micro-b usb connector that you're used to works in a micro-a socket.  The big difference is that that micro-a connector is a rectangle, it doesn't have the "clipped" corners that make the micro-b connector look kind of like a trapezoid.  Here's a link to the USB Wikipedia article, they cover it better than I do and they have pictures, too.

What does the different connector mean to you? It means the socket doesn't have an obvious up side (or downside).  I know I'm guilty of blindly trying to plug a cable in, doesn't fit, flip it and try it again.  With the more common micro-b connector this isn't a problem.  The metal casing on the connector will only fit one way so if it doesn't fit, it just doesn't fit.  But the HP Chromebook 11 doesn't have a micro-b socket, it's got a micro-a socket.  This means that the metal casing will fit either way.  The only thing stopping it from going in upside down is the thin little plastic strip that holds the metal contacts.  Do you see the problem with this?

So enough about the Chromebook 11, how about the Chromebook 14?  It doesn't have the same problem as the 11.  It's got a more standard barrel connector.  It seems fairly robust.  I haven't spent much time with this one so I don't have a lot more to say about it.

Now let's get to the latest Chromebook that I've tried out.  The Dell Chromebook 11. I got it out of the box and was thrilled to see the standard Dell barrel connector.  The power adapter is a 65W adapter.  It's got rounded corners and doesn't look like the other Dell power bricks that I'm familiar with, but the business end is the same.  It even has the light up ring where the cord goes into the back side of the barrel connector.  I checked it out, it looked pretty cool.  But I didn't plug it up.  Right there on my desk was another Dell power adapter from another Dell laptop (not a Chromebook), I picked it up, plugged it in and.... It blew up.  Wait, no it didn't.  It just worked.

So there we go, the Dell Chromebook 11 has a nice big, fat, rugged power connector.  And it's not unique, it's a Dell connector.   There's a thriving market for Dell laptop chargers.  Try finding an after market HP Chromebook 11 charger (which isn't the same as a HP Chromebook 14).  Heck, try to find an OEM adapter for that matter.  The HP is always out of stock.  Good luck finding a replacement if your dog eats homework, er.... Chromebook charger.

Monday, March 10, 2014

Disable Chrome Frame

Now that Google has ended support for Chrome Frame (see here) the time has come to transition to their new Legacy Browser Extension.  I've run into a few systems that I'm unable to remove Chrome Frame from.  This wouldn't be an issue except that we have a new site that's IE only, and Chrome Frame is ignoring the policy to render the site with IE.  So now they open it in Chrome, the LBS extension kicks them over to IE and then it gets rendered in Chrome Frame.  That's extremely helpful, right?  Easiest solution is to remove Chrome Frame, right?  That would work great if it would uninstall, but the uninstaller fails.  So I tried to install a newer version so I that I could maybe get it to uninstall.  That didn't work either, the installer fails.  So what about a quick and dirty way to disable Google Chrome Frame?  You can go into IE and disable it through the Add-On Manager, but I need to disable it on a bunch of machines.  How can you do that?  Just push the registry key to the machine that says disable the Chrome Frame.  What is that registry key?  Actually, it's two keys and here they are (just cut and paste this into a .reg file for easy import).

Windows Registry Editor Version 5.00[HKEY_CURRENT_USER\Software\Microsoft\Windows\CurrentVersion\Ext\Settings\{ECB3C477-1A0A-44BD-BB57-78F9EFE34FA7}]"Flags"=dword:00000001"Version"="*"

Import those keys to disable it and just delete them to re-enable.  Which hopefully you will never have to do once you get Legacy Browser Support up and going.

This is for my old XP machines.  I haven't run into this issue on Windows 7 yet, so I haven't bothered with testing it there.

Saturday, March 8, 2014

Asus Chromeboxes are almost here!

It's been a month since I first went on about a new Chromebox from Asus (see here), but they have finally arrived... almost.  AnandTech is reporting (here) that the boxes are available for pre-order Newegg, Amazon, and TigerDirect.  The one change from the initial press release is that the systems are not going to be fanless.  The fans are supposed to be variable speed and not required to run all the time so noise shouldn't be a major issue.  However, I do miss the whole "no moving parts" thing.  As a plan to use these for a replacement for a thin client I do wonder how the fan will affect it's longevity.  I guess I'd rather have the box running cooler, but moving parts are more likely to fail that solid state parts.  I just hope they chose to use high quality parts in their fans.

Saturday, February 22, 2014

Following Locked Accounts to Find a Conficker Infection

I recently had several users reporting that they were unable to log in because their accounts had been locked out.  This perplexed me, because we have really lax account lockout policies.  There's no way one user, much less a bunch of users, could have tried enough wrong passwords to actually lock their accounts all on the same day.  Something fishy was going on and it was going to require some investigation.

I started with the Account Lockout Tools from Microsoft.  You can find those here, http://www.microsoft.com/en-us/download/details.aspx?id=18465

After you download and install them, you'll have to go find the files, they don't add icons to the Start Menu for you.  The default install location for the files is C;\Program Files\Windows Resource Kits\Tools.  The one you'll want to run is lockoutstatus.exe.

When you run the lock out status utility you'll provide it with a username and domain of an account that has been locked out.  The utility will run against all of your domain controllers and list which one the account was locked from, it will also give you a time too.

Once you know which DC is was locked on we need to go look at the Event Viewer on that server.  Check out the security logs.  If your server logs are like mine then there are a bunch of events listed.  To make things easier filter the log to only show Event ID 4740.

If you've got a machine infected with conficker like I did you'll probably have a lot of these User Account Locked events.  Technically, it could be an individual or organization trying to hack your system too.  But in my experience and in this environment it's usually some kind of virus doing it.

Most of the events had time stamps really close together.  I looked through the logs around the time of the lock event reported from the lockoutstatus tool and found where that user account had been locked.  This event and the others were a red flag that something was going on, as this lock event and several of the others were happening in the middle of the night.  That wasn't all though, the lockout events were scattered all over the day.

Now, let's use this information to track down our conficker infected machine.  Open up one of these events and scroll down in the General tab and look for the Additional Information section at the bottom.  What you want to find is the Caller Computer Name, this will be your infected machine.
Event ID 4740, look for the Caller Computer Name

You might also want to scroll through and look at several of the events to see if they're all coming from the same machine.  In my case I actually had 3 old machines that hadn't been patched correctly and were infected.

One of the easiest and fastest ways to verify a conficker infection is to use to the Conficker Eye Chart.  Yes it has a ridiculous name, but it's simple, fast, and it works.  If you haven't used it before, it just loads a web page that pulls images from the major security vendors.  Since conficker blocks access to those domains based on what images load and which ones don't you can tell if you're infected and possibly by which variant.

Once I had confirmed that it was conficker, I ran the Microsoft Malicious Software Removal Tool to remove the infection.

This sounds like a long process but don't get discouraged, in reality it flows pretty quickly.

Friday, February 14, 2014

A New Chromebox from Dell?

I swear this blog isn't just about Chrome devices, there's just been so much news about them lately and they're such a good fit for education.

It looks like Dell may be preparing to release a Chromebox.  They may have gotten to the Chromebook party really late but it looks like they might show up at the Chromebox party pretty close to everyone else.  Well, I guess technically Samsung has had a Chromebox out for years, but one person doesn't make a party.  They were just really early, because it seems like the Chromebox party is just starting.

I haven't seen any direct press from Dell about a standalone Chromebox, but I've seen Dell mentioned several times as being one of the providers of the Chromebox for Meetings* hardware.  In fact, here is Dell's own press release where they mention that they are developing a Dell Chromebox for meetings.  Surely if they're developing one for meetings they'll develop one that's not just for meetings.... You know, one that's good for regular day to day use, too.

If you happen to be stuck in a Dell only shop, it looks like you will not be left high and dry when it comes to Chromeboxes.

It looks like the Chromebox vendors are started to really line up.   It seems like Samsung has had one forever (they're on their 2nd generation) and now HP, Asus, and Dell are going to be releasing models.


*Just in case you missed the "Chromebox for Meetings" news, I'm not kidding, they really chose to call it Chromebox for Meetings, here's a link to the Google page to prove it:
http://www.google.com/intl/en/chrome/business/solutions/for-meetings.html

Wednesday, February 12, 2014

VDI and Chromebooks

VDI, Virtual Desktop Infrastructure, right? In the K-12 market it hasn't made a whole lot of sense.  There are some good use cases for it (customized lab environments anyone?), but the cost of maintaining it hasn't made sense.  The dollar cost and the manpower cost, too.  Traditionally, school technology departments have been understaffed.

VDI falls into the category of nice to have, but not very feasible to implement.  The obvious problem is cost.  You want me to deploy $300+ thin clients?  Wait, I'm getting fully functional refurbished computers for $300 or $500 (depends on the model).  Ok, so just deploy those desktops and then use them as clients.  That would work... Except now we're maintaining a bunch of desktops and a bunch of virtual machines.  Remember what I said about the manpower cost?  We're already under staffed as it is, who's going to keep all of those machines up and running?

That's where the Chromebooks come into play.   They can be had for less than $300, which makes them cheaper than thin clients.  And those are even portable in a laptop form factor too.  How about desktops?  That hasn't been as cheap until just recently (see my post here http://practicalschooltech.blogspot.com/2014/02/an-affordable-chromebox-finally.html).  Combine that $179 Chromebox with a monitor, keyboard, and mouse and now you've got a full thin client for around $300 too.

You might be wondering now, what's the big deal.  Now you've got to maintain all of those Chrome devices and the VDI.  Chrome devices don't have that much administrative overhead.  They patch themselves, there's no software to install, and a reboot fixes most problem.  Still got problems?  Swap one Chrome device for another, all the users stuff follows their login so it's seamless to them, and work on the malfunctioning device on your own schedule.  The users are happy and the tech staff is happy too.

This sounds good in theory, but how feasible is it, and how well does it work in practice?  I agree with the theory and in practice I don't know, because I haven't tried it yet.  But the feasible-ness has been a real question wondering around in my mind.  Sure, there were remote clients available for the Chrome devices, but no body had a whole package put together to build VDI and use a Chrome device as a client.  Was I missing something?  Was it just so obvious nobody had done it?  Was it not possible?  Did it just not work very well?

Since I don't have any VDI infrastructure in place I couldn't really test how well it worked in practice.  I've remoted hundreds of machines from my Chromebook, using both VNC and RDP.  I haven't had any problems there, but I'm not a typical end user.  I know the addresses of the machines that I'm connecting to and I'm so used to minor hiccups my mind just glosses right over them and I don't even notice them anymore.  With out actually having all the pieces to try it myself I needed to see someone else doing it, or at least trying it.

That's when I stumbled upon Citrix's VDI-in-a-Box setup.  Specifically, their HTML5 Receiver (which ironically, specifically targeted Chrome at first but now they've switched to HTML5).  Here's a post from Citrix themselves talking about it, http://blogs.citrix.com/2013/12/05/new-in-vdi-in-a-box-5-4-built-in-html5-receiver/, and check it out.  The first use case they mention is "schools", in fact that's the opening word of the post.  Exactly what I was looking for, somebody that was trying to put the pieces together.  Now I've just got to get my hands on a demo copy of the VDI-in-a-Box so I can try it out and see how it works.

Anybody out there had any experience with this yet?

Tuesday, February 11, 2014

Linksys Router Demo pages

A little bit off topic of practical school tech, but seeing that if you're here you can probably appreciate the technical nature of this post.

Ever try walking a friend through a router setup remotely?  Usually if you're doing this they don't have working internet so screen sharing is out.  Find yourself saying often, "Do you see something that says status?"  Or my favorite, "What does it say on the screen now?"  Usually while I'm saying these things I've got Google image search pulled up looking for a "linksys e6900 configuration screen" (or whatever model they have) and hoping that someone has uploaded a picture of it.  A picture is worth a thousand words, right?  Even a simple shot of the E6900 configuration page like this one can save an hour of trying to describe over the phone what button they are looking for.


If that pictures worth a thousand words, how much would an accessible interface be worth?

I think I'm a little late to the party but I found an awesome site the other day that is even better than a picture. Full, interactive copies of the user interface of multiple models including multiple firmware versions.

http://ui.linksys.com/

It's by Linksys so it's only their routers.  Take what you can get right?  It's even fairly up to date.  I couldn't find one of their latest models, but did see files from October or November of 2013.

Friday, February 7, 2014

Another day another Chromebox, or two.

HP announced today that they are going to be offering a Chromebox as well.  Here's their page if you're interested, http://h20435.www2.hp.com/t5/The-Next-Bench-Blog/HP-Chromebox-Chrome-simplicity-tiny-desktop/ba-p/87295.

Google announced their Chromebox for Meetings, too.  Technically it's not a new Chromebox, it's just a bundle that combines the new ASUS Chromebox, a camera, a speaker, a mic, and a remote.  Here's some of the details from Google on this one, http://googleblog.blogspot.com/2014/02/chromebox-now-for-simpler-and-better.html.

That's pretty amazing isn't it?  It seemed like the manufacturers were just going to let the Chromeboxes wither and die for so long and now they're popping up all over the place.  Check out the Chromebase that LG announced back in December, http://lgnewsroom.com/newsroom/contents/64056.  This one isn't really a Chromebox, but it's definitely not a Chromebook either.

Why is this even relevant to practical school tech?  ChromeOS devices are pretty easy to manage, fairly stable, designed to be reliable (mostly fanless and all solid state), and can be priced pretty cheap.  All important things for the education market.  Now let's see if we can get our hands on some so we can go kick the tires and see if they live up to all this hype.

Wednesday, February 5, 2014

An affordable Chromebox.... Finally

I really like the idea of ChromeOS devices for school use.  Think about it, automatic updating, very narrow attack vector, fast boot, plain and simple operation.  What's not to like about it? Ok ok I understand, everything has to be web-based.  But is that so bad?  Really, how often is your connection to the internet down?  I know lots of people talk about how good the cloud is and a lot of people preach about how bad the cloud is.  Wait a minute, I'm getting side tracked, I'll save this topic for another post, let's move on to what I was wanting to talk about.

Chromeboxes.  More importantly, affordable Chromeboxes.  Asus has announced a new Chromebox starting at $179 (really, read about it here http://www.asus.com/us/News/xjbJtLA1HEyUSUeo).  That's pretty cheap, right?  But you might be saying the Samsung Chromeboxes for $300 or $500 were affordable too.  Yes, they were affordable, until you consider that you can buy a refurbished computer for $500 (with a monitor.)  That's a full PC too, it runs Windows and everything.  Chrome versus Windows is going to be another post.

Back to the affordable Chromeboxes, in education every dollar counts, $179 is much more affordable than $300.  That's a lot more computers being made available for the students.  I'll call that a win.

Now for my rant.

Chromeboxes have been out for some time.  Just a small computer that runs ChromeOS, nothing particularly special.  The prices have been ridiculously high though.  Before today's announcement they were around $300 dollars.  That doesn't sound too bad for a computer.  But, Samsung has a whole Chromebook for $249.  Some might point out that that's obviously different because it's an ARM processor and the Chromeboxes all have Intel processors.  I could care less about that.  I need a computer that runs, the ARM based Chromebooks do that just fine.  Why not strip out the portable bits of a Chromebook and squeeze them into a super small package?  How much could you save if you cut off the screen, battery, keyboard and trackpad?

Monday, January 20, 2014

Fixing Bootable USB disks in Windows 7

A couple of months back in my post on installing Cacti I mentioned that I first ran into trouble copying the image to a flash drive.   At the time I quickly moved on to another flash drive and continued to install Ubuntu. The problem flash drive got dropped back in the box with other flash drives to be fixed another day.  Well, that day came.  I needed to install a fresh copy of Windows 7, I grabbed the flash drive, started up the Window 7 USB DVD Download Tool and proceeded to copy the image to the flash drive.  Not so fast, I ran into problems copy Windows just like I did copy Linux.  Luckily, this time I wasn't under such a time crunch so I had a minute to fix the problem rather than just grabbing another drive.

A quick Google of the "Unable to copy files" error message turned up Julio Franco's post over a TechSpot. His instructions were spot on.  I just have this bit of insight to add.  He mentions at the end that you need to be careful in selecting disks.  Yes, you definitely need to be careful in selecting disks or you'll be in serious trouble when you get finished.

A quick way to make sure you get the right disk.  Unplug your flash drive, do the "list disk" command, then plug your flash drive back in, and do the "list disk" command again.  You should notice an extra disk show up between the first time you typed the command and the second time.  That disk is your flash drive.


Friday, January 10, 2014

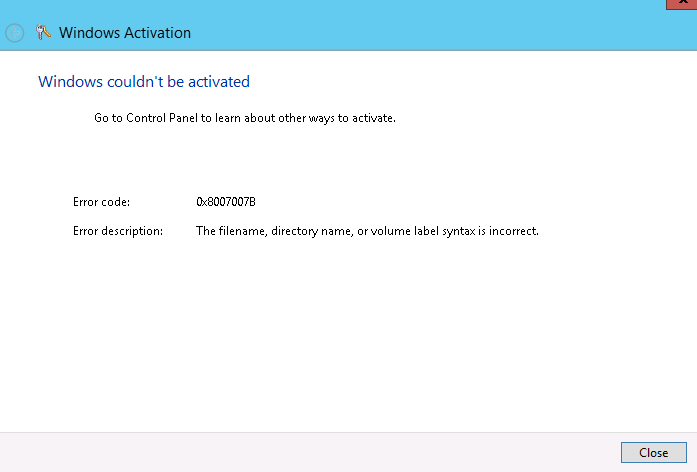
Server 2012 Activation Error 0x8007007B


I recently noticed that I had one server that refused to activate.  There were several of these begging for activation before I got Key Management Server (KMS) up and running and I thought they had all activated. Apparently, I overlooked one.  I logged into a rarely used box and there it was, requesting activation.  Ok, simple enough, I didn't know why it hadn't activated on it's on, but that was ok, I'd click the box to activate it.  Not so fast, I clicked the box, waited for it to finish and then I got hit with a "0x8007007B Windows couldn't be activated" error message like this one.


How friendly, at least it had an error code.  So I started my search of what causes this error.  I investigated some of the causes others had posted and didn't have any luck.  Then I found this Microsoft knowledge base article.  Method #3 is what pointed me in the right direction.  I tried the mention command

nslookup -type=all _vlmcs._tcp>kms.txt

and got this "Non-existent domain" error message.

Non-existent domain

I don't think that's supposed to happen.  I try this command on another server and it generates a nice pretty txt file similar to what's shown in the kb article.  This means we've uncovered another sympton.  Time to do some more digging and to figure out what can cause this error.

It turns out what was happening is that the DNS suffix (the part after the host name) wasn't getting added correctly to DNS queries.  What this means is when it tries to lookup these records that it is failing because it doesn't know the domain name, hence the "Non-existent domain".

Here's an article that I found about DNS suffixes.  It mentions this handy powershell command to check your settings.
Get-DnsClientGlobalSetting
Here's what my settings looked like.

Get-DnsClientGlobalSetting

This might be part of my problem.  Off to the network adapter configuration we go.  I check the DNS settings and the DNS suffix for the connection appears to be correct.  For whatever reason the server is just refusing to use it.   Luckily, there's a handy "Append these DNS suffixes" section right above that. I added the correct DNS suffix right there. It now looks similar to this screen.

DNS Settings

After click OK half a dozen times I was ready to try to activate Windows again. Success.... It worked that time.


Friday, December 13, 2013

DFS Replication and the SYSVOL Problems

I recently noticed on one of my domain controllers that there were some warnings in the Event Log for DFS Replication.  Well, actually what I noticed was that the SYSVOL folder on some of my DCs didn't have all of the GPO folders.  A bit of searching to find out what causes that led me to looking into the Distributed File Services Replications.  Which in turn led me to the event viewer.  Which led me to the Warning ID 2213 from DFSR.

Warning 2213
The warning


Yay! I love warnings in the event viewer.  Wait, this is just a warning, "Hey, by the way I'm not replicating your crap any more and I'm not going to replicate it any more until you manually intervene."  Isn't that nice?  This looks like something that should be more than just a "warning."

The warning looks a bit scary, but it is very helpful in that it tells you exactly how to fix it.  Have to give Microsoft points for that one, put the fix right there in the warning.  I mean, you can copy and paste the command out of the warning message and into a command prompt and it'll fix itself.

Now, why exactly did I have to wade through the event viewer to find this warning and this command?  Where's Clippy when you need him?  A nice "Hey I noticed you didn't do a clean shutdown, would you like to re-enable your SYSVOL replication, it might be important?"  Why did they neglect that?  When I log back in it asks me why it was shut down improperly, why not take that same opportunity to ask about re-enabling the replication too?

But, I digress, back to fixing replication.  What you ask?  I'm not done yet?  I told you to cut and paste the command from the event description to fix it didn't I?

If you're like me, it didn't work.  I selected the text, I copied the text, I click on the Powershell prompt, waited it for it to open, I pasted the command and finally pressed enter.  Only to be greeted with an "Unexpected switch at this level" message.  Well that was nice and friendly.  I bet I need an elevated prompt.  So this time I right-clicked on the Powershell prompt and selected "Run as Administrator."  Surely that will fix it, nope, it doesn't, it gives you the same error message.  Ok, so I must have just not selected everything before I copied.  I tried it a few more times, nothing, same error message.

Now it's time to hit the internet.  I do some searching and I find this post over on howdoicomputer.com.  It looks like they ran into the same problem.  The trick is to use a regular command prompt, not a Powershell prompt.  How do you like that?  The answer's right in the event message, "from an elevated command prompt."  So Microsoft's be all end all Powershell prompt is useless when it comes to using this WMI command.

I also ran into the DFSR error 4012 that they mention in that same post over at howdoicomputer.com.

Error 4012
The error

By default, you've only got 60 days to correct the problem, after that it will not restart replication.  The quick fix for that is to change that default window to something greater than however many days you have been out of replication and then run the command again.  The command for increasing that default is:

wmic.exe /namespace:\\root\microsoftdfs path DfsrMachineConfig set MaxOfflineTimeInDays=200

That 200 on the end is the number of days to increase it to (you can pick anything above how many days you're out)..  I'm a bit embarrassed to admit, that I had run substantially longer than the 60 day default (you can see in the screenshot) and had to increase it a lot to get it to run.  However, when I finished I did set it back its default of 60 days.

When it's all said and done you should get a Information event from ID 2214 that says the replication service successfully recovered.
Information 2214
It's fixed!


Friday, December 6, 2013

Troubleshooting Google Chromebook Policies

Using Google Apps to manage policies Chromebook Policies?  Want to know what settings are applied to a device (or user) and when they were last updated?  Then I have found your new best friend, chrome://policy/, just load it up and take a look at what policies are getting applied.

chrome://policy
chome://policy

The key pieces of information that I used were the "Last fetched" and "Applies to".

Another handy item listed there is the "Reload policies" button.  It comes in real handy for testing how changes affect the operation of the system.

Now I just have to go check out what this looks like on a Windows system running Chrome.

Wednesday, November 20, 2013

ZCM and the "Open File - Security Warning"

I kept building my ZCM (ZENworks Configuration Management) bundles to launch executables off of network shares and I kept finding that my apps either wouldn't ever run or I'd get the "Open File - Security Warning" box complaining that the file might not be safe.  Here's what that error looks like if you're not sure if you're seeing the same thing.


What I figured out was that when the bundle just ran and ran forever but never actually did anything, it must have opened this window in the Dynamic User's context and not the current user's context.  So it was sitting there waiting for someone to click Run, but no one could see it to click on it.  I could however reliably launch one application and while it was running and not doing anything, I could launch another application and it would give me the above message and I could click Run and it would go about it's business and launch.  

I don't want to train my users to click Run on random security warning boxes so I don't like leaving it up to them to click on it.  Also, since it only comes up part of the time it's not even a reliable fix.  So I went looking around for a better way.

I came across Joe Parsons post here about this same error and SCCM.  He references a Microsoft Knowledge Base article about the error and a way to get around it when running VBscripts.  That doesn't make a direct application for us in ZCM, but it puts us on the right track. 

To fix the problem we just need to add the mentioned SEE_MASK_NOZONECHECKS variable to the environment on the computer.  Easiest way to do that is in the bundle itself, just modify the "Launch Action" to add the variable and set it equal to 1.  Here's what it looks like when you've got it in there.


Tuesday, November 19, 2013

A week, er..... a month with Cacti

This post started out as a "one week after" post but now it's been almost a month. You can see my posts about that here for part 1 and here for part 2. I thought I would share the lessons that I've learned now that it's been up a week month and I actually have some data in it to chart.

Just a little background in case you missed my earlier posts. My reason behind setting Cacti up was to be able to monitor the utilization of our WAN links.  We weren't having any problems with them, but we wanted a little visibility into how much traffic they were passing.

After Cacti was setup, I just had to add devices and charts in place.  That work flow for that went like this:
Console > Device > Add > insert Description, insert IP address, pick host template, enter SNMP info > Create
Rinse and repeat.  There wasn't much variety here, just plugging in IP's and making the connections.

That gets all the devices in there, now I just had to add some charts. That went like this:
Console > Device > pick a device > Create Graphs for this Host > check an Interface > select an Graph type > Create
I learned a couple of lessons on this step.  One was that I like the graph output of "In/Out Bits with Total Bandwidth".  I tried out some of the other ones, but I settled on that one.  The other lesson I learned was pick the actual interface, not the virtual interface on switches.  I initially picked the virtual interface and couldn't figure out where the traffic was.  Easy fix, just pick the physical interfaces instead.  That wasn't too bad, I just had to look up which ports connected to the WAN.

So total time invested is only a couple of hours.  The majority of that time was spent in 5-10 minutes at a time making adjustments and then checking back on it an hour or so later to see what it looked it.

I've also made a couple of tweaks to the graph templates to make it easy to scan down the list and compare traffic, but I'll cover those in another post, so stay tuned.